Web Admin Blog

Real Web Admins. Real World Experience.

My First Experiences with a Palo Alto Firewall

I’ve been following Palo Alto as a networking company for a couple of years now.  Their claim is that the days of the port-based firewall are dead and that their application-centric approach is a far better way to enforce your access controls.  Take the HTTP protocol for example.  HTTP typically runs as a service on port 80, but does that mean that everything running on port 80 is HTTP?  As an attacker looking for a way to funnel data out of your organization, why not use the standard HTTP port to send data, since I know you leave it wide open in order for your employees to surf the web.  There’s nothing to say that I actually have to be running an HTTP server on the other end and there’s nothing on my classic firewall to tell any differently.  At first, I was admittedly a bit skeptical.  I didn’t think that you could really tell enough about different applications on the web to be able to separate them out like Palo Alto claims to.  Fortunately, Palo Alto reached out to me and provided me with a brand new PA-200 in an attempt to change my mind.

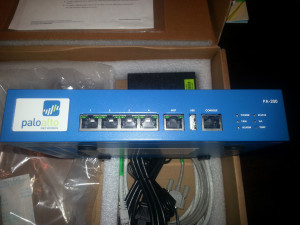
When the PA-200 arrived, it came with everything that I would need to get it up and running.  That includes the unit itself, a power supply, a D89 to RJ45 console cable, an ethernet cable, and some instructions and warranty information.

20140521_175741

On the front of the unit is four ethernet ports for your devices, a management port, a USB port, a console port, and several status indicator LEDs.

20140521_175845-2

By default, the appliance is configured with ethernet ports 1 and 2 paired as a WAN to LAN link as this is the configuration that the majority of the people who buy it will likely use it for.  That said, by following the instructions to connect your computer up to the management port, you can quickly access the user interface that allows you to change this assignment.

Ethernet Configuration

This shows the ethernet 1 and 2 interfaces as both being a “virtual wire” and here we can see the virtual wire that connects the two.

Virtual Wire

From here, we can take a look at the “zones” and see that our two interfaces have been defined as an untrusted (ethernet 1) and trusted (ethernet 2) zone.

Zones

To think of this a different way, my cable modem WAN connection (ie. the Internet) goes in my “untrust” zone and my local network (ie. LAN) goes in my “trust” zone.  Now all that’s left is to set our policy and for ease of management to start with, I set it to allow everything out with a default deny all inbound.

Security Profile

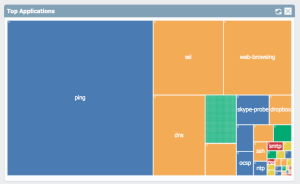
With this configuration I had done enough to be up and running on the device and I immediately started to see data populate the dashboard on the top applications running on my network.

Top Applications

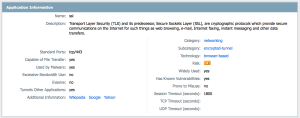
It’s color coded based on risk level and the dashboard also provides me a similar view of Top High Risk Applications.  Any of these boxes can be clicked on in order to provide additional data about the protocol, sources, destinations, countries, and more.

Application Information

Now, let me say that while I’m running this on my home internet connection, this thing is a hoss and can do way more than I can throw at it.  With their App-ID technology enabled you can throw 100 Mbps of throughput at it no problem.  In addition to being an application firewall, it also does standard port-based firewalling, VPN, routing, switching, and so much more.  It’s so extremely versatile that this thing could easily be placed in a smaller branch office and replace multiple other devices on their network such as a firewall, router, and VPN concentrator.  More functionality for less money…who wouldn’t want that?  In addition to these default capabilities, additional licensing can also be obtained to allow you to do URL filtering, malware detection, and more.  Having just gotten this up and running, I’m still exploring the ins and outs of all of the functionality, but it’s pretty exciting to have all of this capability in a box that is smaller than the cable modem my ISP provides me.  More posts to come on this as I get deeper into the guts of running my new Palo Alto PA-200 !

Rise of the Personal Firewall

The other day I read that Comcast is launching a new plan to turn home internet users into unwilling participants in their new global wifi strategy.  I’m sure that they will soon be touting how insanely awesome it will be to get “full strength” internet access virtually anywhere just by subscribing to this service.  Other than the issues with taking a service that the consumer already pays for and carving out their bandwidth for other people, the security practitioner in me can’t help but wonder what the security ramifications of sharing an internet connection like this actually means.  Combine this with the default access to your cable modem that your service provider already has, and it paints a very scary picture of network security for the home user.  It is no longer sufficient (if it ever was) to rely on your cable modem for network access controls.  Thus, I am advocating in favor of placing a personal firewall between your cable modem and your network for all home internet setups.

Now, it’s not as bad as you may think.  It doesn’t have to be some crazy expensive piece of equipment like you’d purchase for a business.  Even the basic home gateways come with the ability to do Network Address Translation (NAT) which effectively turns your internet connection into a one-way pipe.  All I’m saying is that instead of plugging your network devices directly into the cable modem for Internet access, you should use your own hardware and draw a clear “line in the sand” between your equipment and theirs.  In addition, I would advocate that you should no longer consider the wifi access provided by the cable modem device as safe and should use your own equipment for this access.  In other words, treat anything on the WAN side of your home gateway/personal firewall as untrusted and protect against it accordingly.

Analyzing NetFlow for Data Loss Detection

The 2014 Verizon Data Breach Investigation Report (DBIR) is out and it paints quite the gloomy picture of the world we live in today where cyber security is concerned.  With over 63,000 security incidents and 1,367 confirmed data breaches, the question is no longer if you get popped, but rather, when.  According to the report, data export is second only to credit card theft on the list of threat actions as a result of a breach.  And with the time to compromise typically measured in days and time to discovery measured in weeks or months, Houston, we have a problem.

I’ve written in the past about all of the cool tricks we’ve been doing to find malware and other security issues by performing NetFlow analysis using the 21CT LYNXeon tool and this time I’ve found another trick around data loss detection that I thought was worth writing about.  Before I get into the trick, let’s quickly recap NetFlow for those who aren’t familiar with it.

Think of NetFlow as the cliff notes of all of the network traffic that your systems handle on a daily basis.  Instead of seeing WHAT data was transmitted (a task for deep packet inspection/DPI), we see the summary of HOW the data was transmitted.  Things like source and destination IP, source and destination port, protocol, and bytes sent and received.  Because many network devices are capable of giving you this information for free, it only makes sense to capture it and start using it for security analytics.

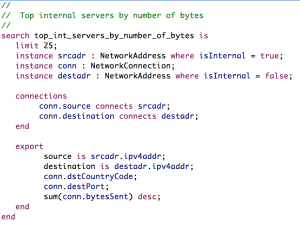
So, now we have our NetFlow and we know that we’re going to be breached eventually, the real question becomes how to detect it quickly and remediate before a significant data loss occurs.  Our LYNXeon tool allows us to create patterns of what to look for within NetFlow and other data sources.  So, to help detect for data loss, I’ve designed the following analytic:

LYNXeon Analytics for Data Loss

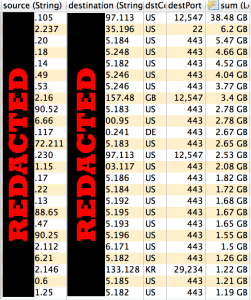
What this analytic does is it searches our NetFlow for any time an internal IP address is talking to an external IP address.  Then, it adds up the bytes sent for each of these unique sets of connections (same source, destination, and port) and presents me with a top 25 list.  Something like this:

Top 25 List

So, now we have a list of the top 25 source and destination pairs that are sending data outside of our organization.  There are also some interesting ports in this list like 12547, 22 (SSH), 443 (HTTPS), and 29234.  A system with 38.48 GB worth of data sent to a remote server seems like a bad sign and something that should be investigated.  You get the idea.  It’s just a matter of analyzing the data and separating out what is typical vs what isn’t and then digging deeper into those.

My advice is to run this report on an automated schedule at least daily so that you can quickly detect when data loss has begun in order to squash it at the source.  You could probably argue that an attacker might take a low and slow approach to remain undetected by my report, and you’d probably be right, but I’d also argue that if this were the case, then I’ve hopefully slowed them enough to catch them another way within a reasonable timespan.  Remember, security is all about defense in depth and with the many significant issues that are highlighted by the Verizon DBIR, we could use all of the defense we can muster.

Rating Your Options for Password Policies and Access Management

Today I did an interesting experiment that I thought was worth sharing with others.  I tried to come up with a ten item list of password/access management policies based on increasing levels of security.  On my list, a “10” effectively means the most secure access management and password polices whereas as “0” effectively means nothing.  Here is my list:

  1. Open Authentication: Exactly like it sounds.  No username or password required.  If you can access the application, then you can get in.
  2. Non-Limited Credentialed Authentication: The use of a username or some form of non-open authentication, but perhaps a globally shared account or extremely weak password like “password”.  (ex: “password”)
  3. Weak Credentialed Authentication: The use of a unique username plus a basic password policy simply limiting the number of characters, but not the content. (ex: “google”)
  4. Complex Credentialed Authentication: The use of a unique username plus a basic password policy not only limiting the number or characters, but also requiring some level of complexity.  This can be easily defeated using Supercharged Password Cracking Techniques.  (ex: “G@@gl3”)
  5. Complex Non-Random Credentialed Authentication: The use of a unique username plus a password policy limiting the number of characters, requiring complexity, and checking against permutations of dictionary and commonly used passphrases, but supporting combinations of multiple dictionary words. (ex: “i@teAHors3”)
  6. Complex Random Lengthy Credentialed Authentication: The use of a unique username plus a password policy where passwords are truly randomly generated and are of a sufficient length to effectively be unbreakable.  Something in the neighborhood of 20+ characters is pretty decent.  This is the point where passwords become so complicated that the average user cannot remember them on their own and are forced to record them somewhere. (ex: “Hh#8qcFhe9H$#324dnakfB3q4fUY@*”)
  7. Non-Complex Two-Factor Authentication: The use of a unique username plus what is commonly referred to as “two factor” authentication.  The use of “something you know”, like a basic 6-digit PIN that is easy for you to remember, alongside “something you have” that is a unique and randomly seeded value.  The key here is that the “something you have” part is something that changes on a very frequent basis such as every 60 seconds. (ex: “147246965201“)
  8. Complex Two-Factor Authentication: The use of a unique username plus the two factor authentication where the “something you know” is a password that is more complex than a simple numeric and the “something you have” is unique, randomly seeded, and changing frequently like above.  Perhaps the “something you have” is even something more than a simple numeric here as well. (ex: “H8n@m78an1vA“)
  9. Non-Complex Three-Factor Authentication: The use of a unique username, the “two factor” authentication piece in number seven above, plus a third “something you are” component.  This is a unique biometric value such as a palm scan, fingerprint scan, or retinal scan.
  10. Complex Three-Factor Authentication: The use of a unique username, the “two factor” authentication piece in number eight above, plus a third “something you are” unique biometric value.

I will admit that this list is dumbed down quite a bit as there are other factors that most certainly can weigh in here as well.  For example, having a maximum password age of one day instead of ninety days can significantly change the amount of time that an attacker has to brute force an account.  Other influencing factors could be the remembered password history and our account lockout policy.  For the most part, though, these can be a component of any of the above policies.

Worth noting here is that as security increases, the user experience is likely decreasing due to increased complexity.  The exception here may be as we move from number six to number seven on my list.  The move to two-factor authentication should add enough constant change to our formula to allow us to have a more simple password while still making it more difficult to brute force the account.  There is a trade-off of having to always carry a token retrieval device with you and having to handle the situation where a user is unable to access their token, but otherwise, this becomes the real sweet spot where usability meets security.

What do you think?  Is my list fairly accurate or am I way off base here?  Am I missing something important?  Please feel free to comment and provide your own list and/or feedback for mine.

Enterprise Risk Management for the Masses

A couple of years ago I decided, along with support from my management, that Enterprise Risk Management would become a focal point for my Information Security Program.  I was convinced that framing vulnerabilities in the form of risks was essential to giving management visibility into issues they currently didn’t know existed and to give our staff the comfort of knowing that the issues that caused them to lose sleep at night were now being considered for mitigation by management.  I couldn’t have been more right.

I began by collecting the risks submitted by each team in Excel spreadsheets and Word documents.  They had all of the pertinent information like a subject, owner, risk assessment, etc, but very quickly I became a victim of my own success.  Before I knew it, I had more risks than I could efficiently track in this format.  First off, it was extremely cumbersome to try to manually maintain the risk index in Excel.  While Excel is good at calculating formulas, it sucks at maintaining links to external documents.  It can be done, but it requires quite a bit of manual effort to do so.  Second, maintaining your risk details in Word documents is something they should reserve only for your worst enemies.  They are difficult to update, difficult to track updates with, difficult to search and, well, just plain difficult.  I thought to myself that there has to be a better way, yet, this is what the unfortunate majority out there are currently stuck with today.

After some research, it turns out that many years back, my company had another security professional who was interested in Enterprise Risk Management.  Apparently, they had come to similar conclusions as I did with the Word documents and Excel spreadsheets, but they were able to get some internal development time to create a Lotus Notes based risk management database.  It was everything that I needed, or so I thought, so I started to manually enter all of my new risks into this old risk management database.  At first, things seemed to be working well.  I had some different views into my data that would allow me to see way more information than I could before.  I also had the ability for management of our various teams to be able to see their risks without involving me.  It was much better, but soon I began to realize the limitations of this approach.  The database itself was rigid.  Changes required me to go through another internal team for resources and it often took a long time to make them.  Also, any updates that were made didn’t modify the current risks, only the ones submitted after that point.  Once, I found myself opening and re-saving hundreds of risks just because I decided to change my risk calculation formula slightly.  I began looking again for another way.

Soon, my new round of research brought me to a special set of tools called Governance, Risk, and Compliance or GRC for short.  There are a number of such tools out there by well-resepcted companies such as EMC Archer and CA.  They looked completely awesome and seemed to solve all of my problems with many more features to spare so I started to get some SWAG quotes from a few of the vendors.  Low and behold, these tools hold a pricetag of $100k to half a million dollars and beyond.  A request for budget for one of these tools was dismissed immediately with management literally laughing at my suggestion.  OK, so maybe it was on me, right?  Maybe I didn’t do a good enough job of selling the tool?  Maybe I didn’t engage the right stakeholders to back my request?  I guess you could call me a glutton for punishment, but I decided to keep trying.  This time I gathered people I thought would be interested in risk from all different areas of our business for a demo of one of the tools.  Trade Compliance, Health and Safety, Facilities, Legal, and many more.  They watched the presentation, asked some fantastic questions, and ultimately left that meeting saying that they thought that a GRC solution was a fantastic idea.  That was until I mentioned the price tag.  If even with a budget split between half a dozen different teams, it wasn’t going to happen, I knew that it simply wasn’t going to happen.

As I began to think about the situation that I was in, I realized that I wasn’t alone in all this.  I talked with friends at various state agencies, friends at risk consultancies, and friends at companies large and small.  They had gone through the same trials and tribulations that I had and fared no better for the most part.  Having spent the better part of the last decade coding random applications and websites in PHP and MySQL, I decided that there may be something that I could do about it.  I would go home from work and start coding until the wee hours of the morning.  I would wake up early on my weekends and start coding again until the family awoke.  After several weeks of this, I had a working prototype for a new risk management system based on some simplifications of the NIST 800-30 risk management framework and running on my LAMP (Linux Apache MySQL PHP) stack.  SimpleRisk was born.

At the time of this writing, I have released 7 official versions of SimpleRisk since March of this year.  It has come a long way since then, but still holds true to it’s roots.  SimpleRisk is free and open source.  The methodology was designed to be as simple as possible, hence the name.  A five step process walks you through the basics of risk management:

  1. Submit your risks
  2. Plan your mitigations
  3. Perform management reviews
  4. Prioritize for project planning
  5. Review regularly

It has every basic feature required of an enterprise risk management system and I’m adding new ones all the time.  It has five different ways to weight classic risk calculations (ie. likelihood and impact) and can perform CVSS scoring as well.  It has it’s own built-in authentication system, but I’ve built an extra module to do LDAP authentication that I’m giving away to anyone who donates $500 or more to the cause.  It also has a half-dozen different ways to report on the risks and many more reports should be complete soon.  You can check out the demo (minus the Administrator interface) using the username “user” and password “user” at http://demo.simplerisk.org.  Or, if you’re ready to dive right in, you can obtain the download package for free at http://www.simplerisk.org.

In order to make your foray into SimpleRisk as simple as possible, I’ve created a SimpleRisk LAMP Installation Guide that you can use to have the tool up and running in about 30-60 minutes.  And if all else fails and that proves too difficult or time consuming, then you should make your way to http://www.hostedrisk.com where for a fraction of what it would cost to buy a GRC solution, you will have your own dedicated SimpleRisk instance, running on hardware dedicated to you, built with security in mind, including extra modules not part of the standard distribution, and you’ll never have to worry about installing or upgrading risk management software ever again.  Hopefully you won’t ever need this, but the option is always there in case you do.

My frustrations with a lack of efficient and cost-effective risk management tools led me to create one of my own.  My hope is that by making SimpleRisk free and open source, it will benefit the rest of the security community as much as it has already benefited me.  If you have any questions or requests for features that you would like to see included in the tool, I’m always here to help.  SimpleRisk is simple, enterprise risk management, for the masses.

Six Reasons Why Your Company Needs a Chief Information Security Officer (CISO)

I am going to start out here by saying that I do not now, nor have I ever, held the title of Chief Information Security Officer (CISO).  That having been said, I do effectively fill this role as the Information Security Program Owner for a large, $1B+ per year, public company.  Some of what follows will be diatribe on my current role and what I would change if given the opportunity.  Some of it will be based on general observations of how I’ve seen other companies handle internal security.  What follows are six reasons why your company needs a Chief Information Security Officer (CISO).

Let’s start out with how I got my current title.  Early in my career I was a *nix Administrator working for a number of different companies.  I did everything from working as support at a website hosting company to building systems as a military contractor.  Even though my official title never had anything to do with security, I have always had a passion for it, so I always found a way to make it part of my job.  Fast forward to about seven years ago where I got a job as a Web Systems Engineer at my current employer.  I quickly realized that there was nobody handling security for our systems so I decided to shoulder that responsibility.  I began by running Qualys scans, analyzing the results, and fixing the vulnerabilities.  Since this was not my primary role, it all of this work was performed in about 5% of my overall time spent, but I was able to keep good metrics and show fantastic results over time.  After several years of working like this, I finally made the decision to dedicate myself to security full-time.  I got a job offer from another company to be a Security Engineer, but decided to see if my current company was interested in allowing me a similar move.  After some discussions and a few presentations on what the job would entail, I was officially allowed to spend 100% of my time on security.  The only catch was that I was now responsible for our IT SOX testing as well.  Now came the question of what to call my new role.  The title “C” anything is reserved for our executives so that took CISO off the table immediately.  Sad.  I was also not allowed to use the term “Manager” in my title since that indicated having people underneath me.  Even sadder.  I finally settled on “Information Security Program Owner” as it indicated an ownership role in security (as close to Manager as I could get) while staying away from those other non-sanctioned titles.

Alright, so what does any of that have to do with needing a CISO you ask?  To start with, I was the only security professional in the entire company of roughly 5,000 employees at the time.  While officially my purview was in the area of IT security for the enterprise, the lack of any other experts quickly made me a hot commodity.  I was asked to participate on various architecture teams, several teams having to do with regulatory compliance, and even to consult with our R&D teams on product security from time to time.  I’d like to believe that it was because I am so awesome that people couldn’t get enough of me, but the God’s honest truth is that the entire company had a need and desire for security and there wasn’t anyone else to assist.  Which leads me to the first reason why your company needs a Chief Information Security Officer:

Reason #1: By definition, the CISO is where the buck stops as far as security is concerned for your organization.  It is the CISO’s job to make sure that security is a concerted effort and that your efforts are not inefficiently duplicated in multiple business units.  Without a CISO, you may may have operational security, but you likely lack direction or a long-term plan for an actual security program.

Now, while my title says “he owns the security program”, the fact is that I am not officially a manager or executive.  Thus, on an official level, I pull about as much weight as any other individual contributor in the organization.  It’s a precarious position to be in.  On one hand I’m charged with ensuring the security of everyone and everything in the company.  Sometimes this can require being the bad guy and telling people their stuff is broken.  On the other hand, I don’t hold enough power to actually force any action that others don’t actually want to take.  Perhaps I’ll write a future post about how I’ve managed to still get things done despite this dilemma, but for now this leads me to the second reason why your company needs a Chief Information Security Officer:

Reason #2: Designating one of your senior security resources as the CISO is a form of empowerment.  You are making a statement that they are the person that you trust to make informed security decisions for the organization.  It helps if you can have them report to another C-level executive, like the CFO, but the most important thing here is the title as Chief Information Security Officer says that they are in charge of everything security (everything Information Security if you want to get technical) for your organization.  This helps tremendously in ensuring that security is still a priority when business turns political.

When you hear the title Chief Information Security Officer, what do you think of?  Maybe the IT guy who handle the IPS system?  The guy who goes running around when a system is infected with malware?  Maybe even the guy who wrote the Information Security Policy if you’re lucky?  Your CISO should be all these things and so much more.  This leads me to the third reason why your company needs a Chief Information Security Officer:

Reason #3: Your CISO is all things security.  Wikipedia does a great job listing some of the many roles of the Chief Information Security Officer so I’m just going to steal them and list them here:

  • Information Security and Information Assurance
  • Information Regulatory Compliance (PCI, SOX, HIPAA, etc)
  • Information Risk Management
  • Supply Chain Risk Management
  • Cybersecurity
  • Information Technology Controls
  • Information Privacy
  • Computer Emergency Response Team
  • Identity and Access Management
  • Security Architecture
  • IT Investigations, Digital Forensics, and eDiscovery
  • Disaster Recovery and Business Continuity Management
  • Information Security Operations Center
  • PR

Obviously one person cannot handle all of these things which is why most companies have a team of security professionals (ie. Information Security Officers) who report up to the CISO, but this should give you an idea as to the wide scope of what the CISO is responsible for.  Chances are that if you don’t have a CISO, then many of these activities aren’t happening.  Even worse, the ones that are happening likely aren’t aligned with your business objectives.  It’s tough to justify spending any money on a program when it performs activities ad-hoc and completely separate from your business.  Which leads me to the fourth reason why your company needs a Chief Information Security Officer:

Reason #4: Your CISO is a business executive that spans into the technical world of security as well.  They should be involved in the business decisions of the company so that they can ensure that the company’s security activities are well-aligned with the projects that the business is undertaking.

Hopefully, your senior security professional is an extremely valued member of your team.  If you are holding off on giving them an official Chief Information Security Officer title, then you are doing both them and your company a disservice.  Security companies are organizing events all the time that are targeted at these executives who control the security purse strings.  Sometimes they call them CISO Roundtables, Summits, or otherwise, but the gist of it is that they are a form of education for the CISO and provides them with the opportunity to network with other security professionals in the area, all on somebody else’s dime.  The catch is that you’re only invited if you’re a CISO.  This leads me to the fifth reason why your company needs a Chief Information Security Officer:

Reason #5: The title of CISO is synonymous with “the person in charge of security” for your company and worlds of opportunity open up for them when you bestow upon them that title.  It means free lunches, free trainings, and a host of other perks that unfortunately aren’t available with a title like “Security Manager” or “Senior Security Engineer”.  Think of it as a job perk that doesn’t cost your company a thing.

Before I wrap this up, I have one final reason why your company needs a Chief Information Security Officer, but it’s certainly not for everyone.  Occasionally, you’ll find a person both technically talented as well as someone who has an affinity and desire to do public speaking.  If this is your senior security person, then it’s time to lock them down as they have the ability to do more positive marketing for your company than your entire marketing department.  This leads me to the sixth and final reason why your company needs a Chief Information Security Officer:

Reason #6: If your CISO is willing and able to give engaging talks about security-related topics, then that person, with that title, can make a world of difference for your organization from a marketing perspective.  Conferences are always looking for new and interesting talks and attendees often consider the speakers as industry luminaries.  No marketing whitepaper will ever come close to the exposure potential of having your own industry expert, presenting on a fantastic topic, using a company branded slide deck, in front of hundreds of security professionals.

There you have my six reasons why your company needs a Chief Information Security Officer.  I hope that this was helpful in your search for becoming or designating your company’s ultimate CISO.  Feel free to add your own thoughts in the comments below.

First Impression of LYNXeon 2.29

Let’s say that you go to the same restaurant at least once a week for an entire year.  The staff is always friendly, the menu always has something that sounds appealing, and the food is always good enough to keep you coming back for more.  The only real drawback is that it usually takes a solid half-hour to get your food, but you’ve learned to find something else to do while you’re waiting because it’s always been worth the wait.  Today you go into the same restaurant, but now the staff goes out of their way to service you, the menu has twice as much selection as before, the food is literally the best thing you’ve ever tasted, and it was on your table just the way you like it within 30 seconds of placing your order.  This is my initial impression of the newly released version of 21CT’s LYNXeon software (version 2.29).

I’ll be honest.  Before we upgraded to the new version I had mixed feelings.  On one hand, I loved the data that the LYNXeon platform was giving me.  The ability to comb through NetFlow data and find potentially malicious patterns in it was unlike any other security tool that I’ve experienced.  On the other hand, the queries sometimes ran for half an hour or more before I had any results to analyze.  I learned to save my queries for when I knew my computer would be sitting idle for a while.  It was a burden that I was willing to undertake for the results, but a burden nonetheless.  We upgraded to LYNXeon 2.29 less than a week ago, but already I can tell that this is a huge leap in the right direction for 21CT’s flagship network pattern analysis software.  Those same queries that used to take 30 minutes now take 30 seconds or less to complete.  The reason being is a massive overhaul of the database layer of the platform.  By switching to a grid-based, column-oriented, database structure for storing and querying data, the product was transformed from a pack mule into a thoroughbred.

Enhanced performance wasn’t the only feature that found it’s way into the 2.29 release.  They also refactored the way that LYNXeon consumes data as well.  While the old platform did a fairly good job of consuming NetFlow data, adding in other data sources to your analytics was a challenge to say the least; usually requiring custom integration work to make it happen.  The new platform has added the concept of a connector with new data types and a framework around how to ingest these different types of data.  It may still require some assistance from support in order to consume data types other than NetFlow, but it’s nowhere near the level of effort it was before the upgrade.  We were up and running with the new version of LYNXeon, consuming NetFlow, IPS alerts, and alerts from our FireEye malware prevention system, in a few hours.  The system is capable of adding DNS queries, HTTP queries, and so much more.  What this amounts to is that LYNXeon is now a flexible platform that can allow you to consume data from many different security tools and then visualize and correlate them in one place.  Kinda like a SIEM, but actually useful.

As with any tool, I’m sure that LYNXeon 2.29 won’t be without it’s share of bugs, but overall the new platform is a huge improvement over the old and with what I’ve seen so far I gotta say that I’m impressed.  21CT is undoubtedly moving in the right direction and I’m excited to see what these guys do with the platform going forward.  That’s my first impression of the 21CT LYNXeon 2.29 release.

Combining Tools for Ultimate Malware Threat Intelligence

Last year I gave a talk at a number of different conferences called “The Magic of Symbiotic Security: Creating an Ecosystem of Security Systems” in which I spoke about how if we can break our security tools out of their silos, then they become far more useful.  Lately, I’ve been doing a lot of work at my company in identifying systems infected by malware and getting rid of the infections because, as you are hopefully aware, the presence of malware on your systems is equivalent to hackers on your network.  Malware can give the controller backdoor access to the system, allows them to scan the network for other devices to compromise, gives them a platform to launch additional attacks from, and enables them to exfiltrate data out of the network.  I have a few different tools which I’ll highlight later that do some really cool things on their own, but when you combine their functionality together, you open up a whole new world of possibilities.

The first tool that I wanted to talk about is for malware analysis.  In our case this is FireEye, but this could just as easily be Damballa, Bit9, or any other technology that will allow you to identify IP addresses of hosts infected by malware, servers hosting malware objects, and command and control servers.  Alone, this tool identifies a single client-to-server relationship, but it does provide a pattern that we can use as a template to find similar issues in our environment where perhaps we do not have coverage with this device.  Now that we have identified the patterns that we are looking for, we need to find a way to discover additional instances of those patterns.  This brings me to our second tool.

The second tool is for NetFlow analysis.  In case you are unfamiliar with NetFlow, it is a feature of most network devices that creates summary information about the network activity that is running through them.  It includes the source and destination IP addresses, source and destination ports, protocols, and bytes transferred.  Specifically, we need a NetFlow analysis tool that is capable of showing us connections between our internal systems and systems on the Internet.  In our case, we use a product called LYNXeon to do this.  Alone, LYNXeon does a good job of allowing us to visualize connections from one system to another, but finding the systems related to malware issues can often be a needle in a haystack because of the NetFlow limitations mentioned above.  So while our malware connections (downloads and command-and-control) are buried in the NetFlow data, we really have no way to identify them in the NetFlow tool silo.

Now comes the fun part.  One of the cool things about the FireEye system is that it provides us with the ability to export data and one of the cool things about the LYNXeon system is that it provides us with the ability to import data and tag it.  So what we do is, in FireEye, we export the list of all systems that we have detected as having been infected by malware.  We also export the list of all of the command and control servers and malware hosting servers that we have seen connections to.  Next, we go into LYNXeon and tell it to import these two lists of IP addresses and tag them with a custom tag that we created called “FireEye”.  We have now successfully combined these two tools and the payoff is huge.

Success #1: Detecting the Spread of Malware on Your Network

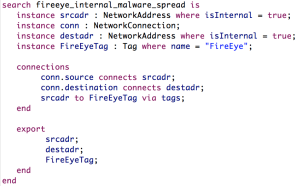
Our FireEye system works by executing downloads inside of a virtual machine and analyzing the affect they have on the system.  Because the virtual machine doesn’t always match the target system, in many cases we are only able to tell that it was malware and not that the malware actually infected the system.  Using LYNXeon, however, we can create special queries that will show us all connectivity from the potentially infected system after the time of the malware download.  Did the system immediately make connections to other foreign systems on the Internet?  Did it start scanning our internal network looking for other hosts to compromise?  All this and more is possible now that we have identified a potentially infected system on our network.  Here is a pattern file which I created in LYNXeon to do this:

spreading malware pql query


And here is the pattern diagram which this query accomplishes:

spreading malware pql query diagram

Success #2: Finding Other Infected Systems

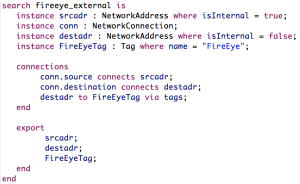
FireEye appliances aren’t free and with offices in over 40 countries around the world getting full coverage can get expensive.  But, if we can use a handful of appliances to get an idea of where our systems are talking to when compromised, then we have data which we can turn around and use in places where we do not have those appliances.  Because we are sending NetFlow data from our devices around the world into LYNXeon, we can search for any connections to these common malware servers.  No more needle in a haystack.  The data is all there, we just needed to know how to look for it.  Here is a pattern file which I created in LYNXeon to do this:

pql query

And here is the pattern diagram which this query accomplishes:

pql query diagram

Success #3: Discovering Other Types of Attacks

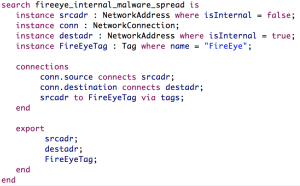
Often times our adversaries aren’t just trying one type of attack and giving up when it fails.  They are trying every trick in their arsenal and trying to gain and maintain a foothold on your network with whatever method they can.  Once we’ve identified an attacker’s IP address, we can now use our NetFlow data to see all other traffic coming from that IP address.  Often times, expanding these types of relationships can shed light on other activities they are performing on your network.  Perhaps they are performing reconnaissance on your servers?  Maybe they are trying to DOS one of your systems?  The fact is that once they’ve been uncovered as a bad guy on your network, you should be weary of all activities performed by them.  Maybe even ban their IP address altogether.  Here is a pattern file which I created in LYNXeon to do this:

other attacks pql query

And here is the pattern diagram which this query accomplishes:

other attacks pql query diagram

So there you have it.  By combining our malware analysis using FireEye and our NetFlow analysis using LYNXeon, we have created a hybrid system capable of far more than either of these tools by themselves.  This is the magic of symbiotic security in action.  Our tools becomes infinitely more powerful when we are able to share the data between them.  Hopefully you will take that into consideration the next time you are looking at purchasing a security tool.

Lessons Learned from Participating in my First CTF

Yesterday I finished competing in my first ever Capture The Flag (CTF) tournament.  It was called Kommand and Kontroll Revenge of the Carders and was run by Rod Soto of Prolexic.  I’m going to caveat this post by saying that this was my first ever CTF competition so I have absolutely no baseline of comparison.  It was also pretty thin on competition (only one other team actively pursuing flags for any period of length).  That said, it is what it is and in the end my team ended up with the win which I’m quite proud of.  We got system level privileges on 15 different systems to come away with both the most points as well as accomplishing the primary objective which I’ll describe more about below.

The competition consisted of somewhere around 30 virtual machines running as servers and workstations on a completely isolated network.  Each system played a role in the scenario that Rod created around a carding ring that got pwn3d by one of its members using a Zeus botnet.  The primary objective for the CTF was to take over command and control of the botnet.  The secondary objective was to capture flags of various levels of difficulty (and points) in order to score more points than the competing teams.  It took the better part of two days to do it, but once we finally got system privileges on the CnC server, it was only a matter of time before we figured out a way to take ownership of it and win the game.  What follows are some lessons (in no particular order) that I learned throughout the competition that will hopefully serve to better myself and others as they compete in future competitions.

  1. Participate with a team: These CTF competitions are most definitely a team sport.  It’s a series of challenges, different types of systems, and different applications.  There’s no way that any one person can be an expert in all of them.  Working with one or more partners means that you have a fresh perspective when you need it.  It also helps when there are situations where time is of the essence.  For example, at one point I had system level privileges on a box and found the flag, but needed a way to get it onto my system.  We had a running FTP server to make the transfer, but this risks the other team seeing the file.  With the help of a partner, we had the file on the server, downloaded, and removed in under 5 seconds.
  2. Keep important files on removable media: I constantly found myself transferring files between different environments.  Some were flags, some were exploit code, others were just files with notes on them.  At one point I had my attack VM lock up on me and die to the point where I had to restore it from a snapshot.  Had I not been keeping my important files on removable media, it would have cost us several flags and many points.  Thank goodness for being prepared.
  3. Don’t submit all of your flags at once: Believe it or not, there’s quite a bit of strategy involved in how you present your team.  Show too little points and people will think you’re a chump.  It’ll encourage others to join the game because they feel they can make up those points quickly.  Show too many points and now the competition feels the need to work harder and faster to catch up.  My partner and I decided that it was best to start off with a low number of points.  We posted a few flags just to show some progress, but kept a large number in our back pocket for later.  At the end of day one I posted some more, but not all of the remaining flags.  In hindsight, this was a bad move on my part as it seemed to get the other team moving faster.  At the beginning of day 1 they posted enough points to overtake us on the scoreboard, but we still had enough flags in waiting at that point to more than make up the difference.  We decided to hold them until the end to make the other team think they had it in the bag.  I think this proved to be a far smarter strategy.
  4. Have a variety of different environments available: Since the CTF machines were running a wide variety of host operating systems, we ran into a number of challenges where we needed to be able to mimic a similar environment.  Fortunately, I had a fairly diverse system that I was running which had OSX, Windows, and Linux.  I found myself constantly switching between them during the game.  I know that other players were definitely hindered by their lack of diverse environments.
  5. Take snapshots of your environments: As I mentioned in #2 above, at one point I had my attack VM lock up on me.  I tried restarting, but no matter what I did, I couldn’t get back into the GUI interface to resume my attacking.  This would have killed my game.  Snapshots to the rescue.  Fortunately, before I started, I took a snapshot of my VMs and was able to quickly and easily roll back to a known good state.
  6. Have Internet access available: Maybe it’s via your phone or via another computer attached to a different network, but there were a number of times where we had to query things on the Internet.  Sometimes it was for scripts (like a PHP C99 shell) and sometimes it was for knowledge, but without Internet access, things would have been far more difficult.
  7. Know how to query an exploit database: Assuming that you found a way to get Internet access, you should know how to use an exploit database like the one at http://www.exploit-db.com.  After you do your discovery, you have a list of running applications, sometimes even version numbers, and need to know if they are affected by any vulnerabilities with known exploits.  That’s where these guys come in.
  8. Update in advance: In several cases, the needed exploit was provided in the latest version of Metasploit.  Unfortunately, my partner had a version that was a bit outdated.  As in the case of this CTF, Internet access was not available in the game environment.  He ended up taking his system onto the conference wireless network to do the update, but it sidetracked him for a fairly significant amount of time.  It’s far easier to update your tools before you walk into the CTF environment so you can spend your time actually hacking all the things.
  9. Be well versed in exploitation tools: The time I spent listening to my friend Raphael Mudge talk about penetration testing with Armitage paid off dividends here as did the many months our study group went through David Kennedy’s Metasploit book.  I went into it feeling like I had a pretty good grasp on the concepts with no practical application of the skills.  Now, I feel like the CTF gave me the practical application and then some.  If you don’t have at least some knowledge of a tool like Metasploit or Armitage, you’re going to struggle.
  10. Explore the system: The system that I mentioned earlier that we used to take over the botnet command and control was one that I had rooted several hours earlier.  I browsed the system, got the flag, and moved on.  It wasn’t until I established a VNC connection to the system that I found the CnC console staring right back at me.  It had been there all along and because I didn’t give the system enough attention, I moved right on past what could have won us the game far sooner.  Remember, there are many different ways to view the data on the system.  Be somewhat thorough while at the same time remembering that time is of the essence.
  11. Know how to use a directory brute forcer: I think that many of the people who came in, played for an hour, and then left got stuck here.  They ran their scan, found some HTTP servers, and connected to them but saw nothing but a “Hello world!” message.  They knew that something was running, but couldn’t figure out what.  Fortunately, I’m familiar with the OWASP ZAP tool and was able to tell it to brute force common directories on the web server.  We found a number of different applications this way that there was really no other way to find.  Your Metasploit exploits will never work if you can’t tell it the proper URI to target.

So, there you have it.  My list of lessons learned from participating in (and winning) my first Capture the Flag (CTF) challenge.  Big thanks to my partners Alek and Nate for pwning systems alongside me.  As I said in #1 above, CTF is a team sport and I couldn’t have won it without you guys.

Malware is Using TOR to Bypass Your Domain Blacklists

About a week ago I turned on a new rule on our IPS system that is designed to detect (and block) users who are using TOR to make their activities on our network anonymous.  You can say that TOR is about protecting a user’s privacy all you want, but I’d argue that while using corporate assets you should have no expectation of privacy (at least in that sense) and that the use of anonymizers on a corporate network can typically be viewed as a sign that you are up to no good.  Almost immediately when I turned on this new rule, I began seeing associated events in the IPS console.  I decided that the best approach was to contact the user directly as they may be wondering why their Internet connection was no longer working.  I reached out to this particular user and explained that if this was the case, then it was because of the new IPS rule.  The solution was simple; just reconfigure his browser to no longer use TOR as the proxy.  But as I began this process, things started getting weird.

I began by telling the user to look for names like “TOR”, “The Onion Router”, and “Privoxy” in his Add & Remove Programs.  Strange….there was nothing there.  Then I asked him to check his Task Manager to look for a running process called “tor.exe” or similar.  Again, nothing.  I was at a loss.  I decided that this was something I needed to get my hands on to figure out so I scheduled some time with the user.

This morning when I sat with the user, I noticed little wrong with his system.  He had a few standard applications running, but nothing unusual.  I checked his process listing and saw nothing out of the ordinary.  I ran Hijack This! and that, too, looked pretty normal.  All this, yet in the meantime I continued to see alerts on the IPS system that his computer was using TOR.  Even when I was sitting at the console with NO browser activity.  So, to make a long story short, here’s how I finally figured out what was happening.  I checked the IPS system and came up with the source ports for the requests that I was seeing alerts on.  I then went on the system and ran a netstat -nao.  This listed all network connections on the users system along with the associated process.  I checked the list and found the entry that matched the port number I was seeing the alerts on.  I then ran the command tasklist /svc /FI “PID eq <process_num>”  This provided me with the name of the process that was running with this process ID which it turns out was “iexplore.exe”.  Wait.  Internet explorer isn’t even running on this computer.  Or is it?  Since the default process viewer in the Task Manager is pretty lame, I downloaded the Microsoft Sysinternals Process Monitor.  It’s a free tool available from Microsoft and provides a ton more information about running processes and allows you to see what they are doing in real time.  I used the Process Monitor to view these processes and focused particularly on the flags that were used when they started.  What I found was actually pretty startling.

Both of the Internet Explorer processes were started with a special flag that told them to start silently (ie. without the UI) in the background.  They also specified a flag similar to this:

–HiddenServiceDir “C:\Documents and Settings\<User_Name>\Application Data\tor\hidden_service” — HiddenServicePort “55080 127.0.0.1:55080”

Aha!  We found our culprit!  TOR was running as a hidden service out of the Application Data directory.  Once I found this, it was all over.  Scanning through the Application Data directory, I also found a file under “Enemvy\ugbie.exe” that was extremely suspect.  A later scan via Malwarebytes identified it as a variant of Trojan.ZbotR.  I deleted these directories and Malwarebytes found one registry key associated with the ugbie.exe file and deleted it.  All is good now and the system is no longer alerting about use of TOR.

So, what’s our lesson here?  The malware writers are getting sneaky.  They’ve realized that we’ve created blacklists of their servers and they need to be able to adapt around that.  Now, they are using anonymizers, like TOR, to get around these blacklists.  Apparently this isn’t the first use of TOR in malware either as I read about something called SkyNet that did something similar.  In any case, they would have gotten away with it if it weren’t for my IPS rule to detect TOR and a fair amount of persistence in finding the root cause.  If you’re not already detecting this on your network, I think that it’s about high time you did it.  You can thank me later.